Is there anyway to partition or containerize workloads in Isilon?
100% yes!
Isilon’s OneFS offers Access Zones to divide different workflows/users/AD servers/ GroupNets/etc. in the same Isilon Cluster.
Learn to setup Access Zones in Isilon’s OneFS. Access Zones allow for administrators to partition the Isilon clusters into different virtual containers. In this episode of Isilon Quick Tips we will walk through setting up Access Zones from the OneFS WebCLI.
Transcript
Hi folks, Thomas Henson here with thomashenson.com. And today we’re going to step into another episode of Isilon Quick Tips. We’re going to learn all we need to know about Access Zones and how to set up Access Zones through the Web CLI and OneFS. So, find out more right after this.
So, the first thing we want to do is we want to log into OneFS. Once we’re logged into OneFS on the Web CLI, let’s go to the file system and our File Explorer, and look at some of the data that we already have in our cluster. And so, you can see that we have an Access Zone here, and our current Access Zone is the system, and that’s the only Access Zone that I have. And our data that’s in our IFS Directory, you can see that we have our home data, we have some HDFS data, and we also have a dataset called Datasets.
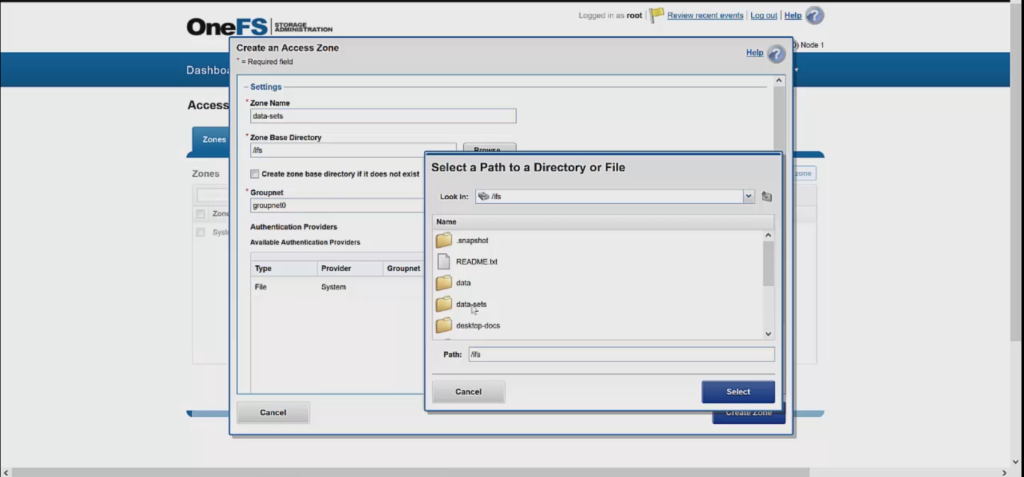
Let’s say that we wanted to partition out that data, we wanted to have one Access Zone in IFS for our system and all our system information. And then the next thing we wanted to have is we wanted to have that dataset and have it separate. Maybe we want to have our own active directory for it, maybe there’s just a need for us to partition that data out. So, let’s go ahead and set up a different Access Zone just for that data. And so, to do that, we’ll go to our Access-Access Zones. You can see that in our Access Zones here, we only have our system just like we just like we saw. So, now we’re going to create that Access Zone. Remember, we’re doing this for our datasets, so we’ll keep the name at datasets.
And then now we want to choose that path, and so one thing to keep in mind when we’re creating these Access Zones and choosing our paths is we want to make sure that we’re not overlapping our directories. So, for instance, if we wanted to create an archive Access Zone from our NASA Directory, we still wouldn’t want to have that NASA Directory in another Access Zone as well, that would create an overlapping one. So, let’s just stick with our datasets. And then you can see that we have our GroupNet. And so, for our IP Addresses, I’m going to keep with the GroupNet that we have. If you wanted to create a different set of IP Addresses for access, you’re more than able to do that. And then you create your Authentication Providers, and we’re ready to create that Access Zone.
And now you can see that we have two Access Zones, so we have our system and we also have our dataset. Let’s go back to look at our File Explorer. Now you can see that we have a current Access Zone of System, where all of our IFS Directory is, so nothing’s changed here. Now let’s look at our datasets. In our datasets, we have that dataset directory. And so, now we have two Access Zones, but let’s go look at our protocols.
Once we’re in our protocols, we’re under the System Access Zone, so we’re paying attention to what Access Zone we’re in. We have our IFS default, and then we also have our NASA share. So, when we go to our dataset Access Zone, we don’t have our dataset file share. And so, what we can do is we’ll need to create that SMB Share, and so keeping it simple here, we’re going to keep it as dataset. So, our name is datasets, and then a small description here. Then we’ll want to keep that path at datasets. Add any users or groups, we’re going to keep it default. And our share’s created.
And so, you can see how quick and easy it was to create an Access Zone. Just remember some of the tips that we talked about whenever you’re creating those Access Zones. You don’t want to have them if there overlapping. Now, OneFS will check for you and give you an error message if you have it and allow for you to do that, but you don’t want to do it. And then second, if you’re creating those Access Zones, remember that you want to add maybe a different Authentication Provider, you can do that, or a different set of IP addresses. Just make sure you have those IPs set before you create that Access Zone, so you can allocate those there.
Thanks, and make sure to stay tuned and subscribe to this video, so you see more Isilon Quick Tips.
